Deploying MySQL HeatWave

This blog post describes how to deploy HeatWave on the Oracle Cloud Free Tier. HeatWave is a distributed, scalable, shared-nothing, in-memory, columnar, query processing engine designed for fast execution of analytic queries. You can learn more about HeatWave here: Oracle HeatWave.
The post walks you through each step, everything from setting up a MySQL DB System with HeatWave to loading data and running queries.
The very first step is signing up for Oracle Cloud Free Tier. Once that is done, you can start the deployment described in the sections that follow. The diagram below provides an overview of the deployment topology.

Creating a Compartment
You are initially provisioned with a root compartment in Oracle Cloud. The following steps describe how to create a child compartment, which we will use for the MySQL DB System with HeatWave.
- From the console navigation menu located at the top left of the screen, select Identity > Compartments.

- Select the root compartment of the tenancy.
- Under Child Compartments, click Create Compartment.
- In the Create Compartment dialog, enter a name for the compartment (e.g., mysql-compartment), and add a description.

- Click Create Compartment.


Creating a Virtual Cloud Network
A Virtual Cloud Network (VCN) is required for the MySQL DB System and the resources that communicate with it. To create a VCN:
- From the console navigation menu, select Networking > Virtual Cloud Networks.

- In the COMPARTMENT field on the left, select the child compartment you created (mysql-compartment).

- Click Start VCN Wizard. (The Wizard automatically creates associated subnets, gateways, etc., which would you otherwise have to create manually.)

- In the Start VCN Wizard dialog, select VCN with Internet Connectivity.

- Name the VCN (e.g., mysql-vcn).
- Under Configure VCN and Subnets, accept the defaults.

- Click Next to review your configuration.
- Click Create.
- After the VCN is created, under Security Lists, select the security list for the private subnet. In this example, it is "Security List for Private Subnet-mysql-vcn".

- Click Add Ingress Rules.

- On the Add Ingress Rules dialog, specify:
- SOURCE TYPE: CIDR
- SOURCE CIDR: 10.0.0.0/24
- IP PROTOCOL: TCP
- DESTINATION PORT RANGE: 3306,33060. Port 3306 is the default MySQL port, and 33060 is the MySQL X Protocol port.

- Click Add Ingress Rule.


Creating a Compute Instance
Next, we create a compute instance for accessing the MySQL DB System. The compute instance acts as a bastion host. Essentially, the MySQL DB System resides on a private network, and you cannot access it directly from an external network (i.e., your local machine cannot access the MySQL DB System over the Internet directly). The compute instance acts as a public entry point to the private network where the MySQL DB System resides.
- From the console navigation menu, select Compute > Instances.

- Click Create Instance.
- Select an image and shape for the compute instance (the defaults are used in this example).

- Click Create.
- In the Create Compute Instance dialog:
- Specify a name. (e.g., mysql-bastion-host)
- Specify the VCN you created earlier (mysql-vcn) and select the public subnet. The compute instance must be on a public subnet so that you can connect to it from your local machine
- Choose an SSH key option. If you already have a public key, you can use it, as we'll do here. Otherwise, generate an SSH key pair.
- Accept the Boot volume default settings.

- Click Create.
- Once the compute instance is created, make note of the compute instance Public IP Address information shown on the General Information tab. It will be required when connecting to the compute instance.


Creating a MySQL DB System with HeatWave
You are now ready to create a MySQL DB System with HeatWave. (HeatWave is a MySQL DB System feature. You can enable HeatWave when creating a DB System, as we'll do here, or you can add HeatWave to an existing DB System later. Either way, a DB System is always required).
- From the console navigation menu, select MySQL > DB Systems.

- Click Create MySQL DB System. You can disregard the MySQL prerequisites information. The prerequisites have already been addressed.

- On the Create MySQL DB System dialog:
- Select the mysql-compartment that you created earlier.
- Enter a name and description (e.g., mysql-db-system; A MySQL DB System with HeatWave.)
- Select the HeatWave option.

- Provide a username and password of your choosing for the MySQL administrative user (e.g., admin).

- Under Configure networking, change the compartment to the mysql-compartment that you created earlier, and then select mysql-vcn and the associated private subnet.

- For Configure placement, accept the default availability domain.
- Under Configure hardware, select a shape and specify the storage size for HeatWave. We'll accept the defaults.

- For Configure Backups, leave the default settings.
- Select Show Advanced Options.
- Under Advanced Options > Configuration, select the MySQL.HeatWave.Standard.E3.VM.Standalone configuration.

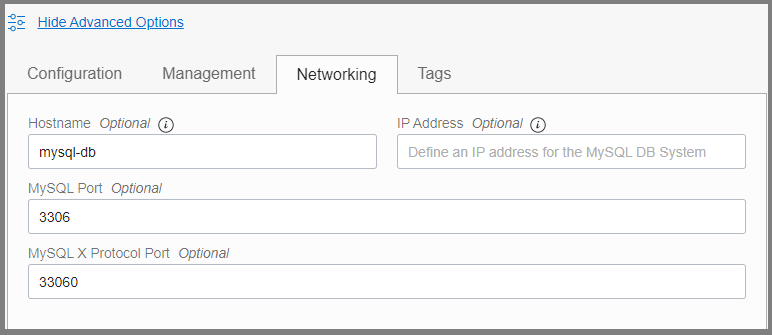
- Under Advanced Options > Networking, specify a host name if you wish. We'll use mysql-db. The MySQL port should be 3306, and the MySQL X Protocol Port should be 33060.

- Click Create.
- After the DB System is created, note the Private IP address that appears on the MySQL DB System's General Information page. You will need it later to connect to the MySQL DB System from the compute instance.

- Also, on the General Information page, under HeatWave, select Enable to enable the HeatWave cluster.

- On the Add HeatWave Cluster dialog:
- Since you have already selected a shape, no need to change it here.
- Specify the number of nodes. We'll accept the 2 node default.
- Click Add HeatWave Cluster.


Connecting to the DB System
Your MySQL DB System with HeatWave is now ready to use. This section describes how to connect to the MySQL DB System using a MySQL Client from the compute instance that you created earlier.
Note: You can also connect to the MySQL DB System using MySQL Shell or MySQL Workbench. MySQL Shell is the recommended utility for importing data into the MySQL DB System. MySQL Shell dump, load, and import utilities are purpose-built for use with MySQL Database Service; useful for all types of exports and imports. We'll cover both MySQL Shell and MySQL Workbench setup in a future blog post.
Before you can connect using the MySQL Client, you have to install it on the compute instance.
1. Connect to the compute instance via ssh. You will need the compute instance public IP address and the location of your public key file.
ssh opc@192.0.2.23 -I ~/.ssh_id_rsa
2. Install the MySQL Client:
sudo yum install
https://dev.mysql.com/get/mysql80-community-release-el7-3.noarch.rpm
3. Connect to the DB System using the MySQL admin username and password that you specified previously. The following command will prompt you for the password.
mysql --host 10.0.1.123 -u admin -p
Creating tpch Sample Data
In order to test HeatWave's capabilities, you need sample data, and a good amount of it, too. This section describes how to create tpch sample data that you can load into the MySQL DB System and into HeatWave.
The tpch sample database is an ad-hoc decision support database derived from the TPC Benchmark™ H (TPC-H) specification. For an overview of the tpch schema, refer to the Logical Database Design section of the specification document. The following instructions describe how to generate tpch sample data using the dbgen utility. The instructions assume you are on a Linux system that has gcc and make libraries installed.
Note: These steps were performed on a local Oracle Linux machine.
To generate tpch sample data:
1. On your local system, download the TPC-H tools zip file from TPC Download Current. Alternatively, you can download a 3rd party version of dbgen utility maintained on github: https://github.com/electrum/tpch-dbgen (the zip file name differs, though).
2. Extract the zip file to a location on your system.
3. Change to the dbgen directory and make a copy of the makefile template.
$ cd 2.18.0/dbgen
$ cp makefile.suite makefile
4. Configure the following settings in the makefile:
CC = gcc
DATABASE= ORACLE
MACHINE = LINUX
WORKLOAD = TPCH
5. Run make to build the dbgen utility:
$ make
6. Issue the following dbgen command to generate a 1GB set of data files for the tpch database. Please make sure you have enough space for the 1GB of data!
$ ./dbgen -s 1
The operation may take a few minutes. When finished, the following data files appear in the working directory, one for each table in the tpch database. If you want to take a look at the data, open one of the smaller files such as nation.tbl.
$ ls -1 *.tbl
customer.tbl
lineitem.tbl
nation.tbl
orders.tbl
partsupp.tbl
part.tbl
region.tbl
supplier.tbl
Creating the tpch Schema
To create the tpch schema on the MySQL DB System:
1. SSH to the compute system and connect to the MySQL DB System using the MySQL Client:
ssh opc@192.0.2.23 -I ~/.ssh_id_rsa
mysql --host 10.0.1.123 -u admin -p
2. Create the tpch schema and tables:
CREATE DATABASE tpch character set utf8mb4;
USE tpch;
CREATE TABLE nation ( N_NATIONKEY INTEGER primary key,
N_NAME CHAR(25) NOT NULL,
N_REGIONKEY INTEGER NOT NULL,
N_COMMENT VARCHAR(152));
CREATE TABLE region ( R_REGIONKEY INTEGER primary key,
R_NAME CHAR(25) NOT NULL,
R_COMMENT VARCHAR(152));
CREATE TABLE part ( P_PARTKEY INTEGER primary key,
P_NAME VARCHAR(55) NOT NULL,
P_MFGR CHAR(25) NOT NULL,
P_BRAND CHAR(10) NOT NULL,
P_TYPE VARCHAR(25) NOT NULL,
P_SIZE INTEGER NOT NULL,
P_CONTAINER CHAR(10) NOT NULL,
P_RETAILPRICE DECIMAL(15,2) NOT NULL,
P_COMMENT VARCHAR(23) NOT NULL );
CREATE TABLE supplier ( S_SUPPKEY INTEGER primary key,
S_NAME CHAR(25) NOT NULL,
S_ADDRESS VARCHAR(40) NOT NULL,
S_NATIONKEY INTEGER NOT NULL,
S_PHONE CHAR(15) NOT NULL,
S_ACCTBAL DECIMAL(15,2) NOT NULL,
S_COMMENT VARCHAR(101) NOT NULL);
CREATE TABLE partsupp ( PS_PARTKEY INTEGER NOT NULL,
PS_SUPPKEY INTEGER NOT NULL,
PS_AVAILQTY INTEGER NOT NULL,
PS_SUPPLYCOST DECIMAL(15,2) NOT NULL,
PS_COMMENT VARCHAR(199) NOT NULL, primary key (ps_partkey, ps_suppkey) );
CREATE TABLE customer ( C_CUSTKEY INTEGER primary key,
C_NAME VARCHAR(25) NOT NULL,
C_ADDRESS VARCHAR(40) NOT NULL,
C_NATIONKEY INTEGER NOT NULL,
C_PHONE CHAR(15) NOT NULL,
C_ACCTBAL DECIMAL(15,2) NOT NULL,
C_MKTSEGMENT CHAR(10) NOT NULL,
C_COMMENT VARCHAR(117) NOT NULL);
CREATE TABLE orders ( O_ORDERKEY INTEGER primary key,
O_CUSTKEY INTEGER NOT NULL,
O_ORDERSTATUS CHAR(1) NOT NULL,
O_TOTALPRICE DECIMAL(15,2) NOT NULL,
O_ORDERDATE DATE NOT NULL,
O_ORDERPRIORITY CHAR(15) NOT NULL,
O_CLERK CHAR(15) NOT NULL,
O_SHIPPRIORITY INTEGER NOT NULL,
O_COMMENT VARCHAR(79) NOT NULL);
CREATE TABLE lineitem ( L_ORDERKEY INTEGER NOT NULL,
L_PARTKEY INTEGER NOT NULL,
L_SUPPKEY INTEGER NOT NULL,
L_LINENUMBER INTEGER NOT NULL,
L_QUANTITY DECIMAL(15,2) NOT NULL,
L_EXTENDEDPRICE DECIMAL(15,2) NOT NULL,
L_DISCOUNT DECIMAL(15,2) NOT NULL,
L_TAX DECIMAL(15,2) NOT NULL,
L_RETURNFLAG CHAR(1) NOT NULL,
L_LINESTATUS CHAR(1) NOT NULL,
L_SHIPDATE DATE NOT NULL,
L_COMMITDATE DATE NOT NULL,
L_RECEIPTDATE DATE NOT NULL,
L_SHIPINSTRUCT CHAR(25) NOT NULL,
L_SHIPMODE CHAR(10) NOT NULL,
L_COMMENT VARCHAR(44) NOT NULL,
primary key(L_ORDERKEY,L_LINENUMBER));
3. Verify that the tables were created:
mysql> SHOW TABLES;
+----------------+
| Tables_in_tpch |
+----------------+
| customer |
| lineitem |
| nation |
| orders |
| part |
| partsupp |
| region |
| supplier |
+----------------+
Loading tpch Sample Data into the MySQL DB System
Data must be imported into the DB System before it can be loaded into HeatWave. To accomplish this, we will upload the tpch data files to an Object Storage bucket using cURL. From there, we will download the data files to the compute instance, where we will use the MySQL Client to execute LOAD DATA statements.
Creating an Object Storage Bucket and Uploading the Data Files
- From the console menu, select Object Storage > Object Storage.

- On the Object Storage page, Click Create Bucket.
- Enter a name for the bucket (e.g., tpch-bucket).

- Accept the default settings.
- Click Create.
- Click Save Changes.
- Upload the tpch data files:
- Click Upload.
- On the Upload Objects dialog, navigate to the tpch data files on your local system. These are the 8 data files you created using the dbgen utility.
- Select the files and click Upload.

- Note of the URL address for the files you uploaded. You can find the URLs by clicking on the Action icon (three dots) for each file object, which appears the far right of the pane (see above). The URLs are required to download the files to the compute instance in the next step.


Downloading the Data Files to the Compute Instance
cURL is used to download the tpch data files from the Object Storage bucket to the compute instance. Once the files are available on the compute instance, you will be able to load the data into the MySQL DB System.
Note: The MySQL Shell importTable() utility can be used to load data directly into a DB System from an Object Storage bucket using parallel load threads. We'll cover this in a future blog post.
1. Log into the Compute instance.
ssh opc@192.0.2.23 -I ~/.ssh_id_rsa
2. Run the following cURL commands to down load the files. Substitute the URL addresses for your own, which you noted previously.
curl -X GET https://objectstorage.ca-montreal-1.oraclecloud.com/n/axipyfug89rs/b/tpch-bucket/o/customer.tbl > customer.tbl
curl -X GET https://objectstorage.ca-montreal-1.oraclecloud.com/n/axipyfug89rs/b/tpch-bucket/o/lineitem.tbl > lineitem.tbl
curl -X GET https://objectstorage.ca-montreal-1.oraclecloud.com/n/axipyfug89rs/b/tpch-bucket/o/nation.tbl > nation.tbl
curl -X GET https://objectstorage.ca-montreal-1.oraclecloud.com/n/axipyfug89rs/b/tpch-bucket/o/orders.tbl > orders.tbl
curl -X GET https://objectstorage.ca-montreal-1.oraclecloud.com/n/axipyfug89rs/b/tpch-bucket/o/part.tbl > part.tbl
curl -X GET https://objectstorage.ca-montreal-1.oraclecloud.com/n/axipyfug89rs/b/tpch-bucket/o/partsupp.tbl > partsupp.tbl
curl -X GET https://objectstorage.ca-montreal-1.oraclecloud.com/n/axipyfug89rs/b/tpch-bucket/o/region.tbl > region.tbl
curl -X GET https://objectstorage.ca-montreal-1.oraclecloud.com/n/axipyfug89rs/b/tpch-bucket/o/supplier.tbl > supplier.tbl
Loading Data into the MySQL DB System
1. On the Compute instance, start the MySQL Client:
mysql --host=10.0.1.123 --protocol=TCP --port 3306 --user=admin -ppassword -Dtpch --local-infile=1
2. Execute the following load statements to load the data into the MySQL DB System.
LOAD DATA LOCAL INFILE "customer.tbl" into table customer columns terminated by '|' lines terminated by '\n';
LOAD DATA LOCAL INFILE "lineitem.tbl" into table lineitem columns terminated by '|' lines terminated by '\n';
LOAD DATA LOCAL INFILE "nation.tbl" into table nation columns terminated by '|' lines terminated by '\n';
LOAD DATA LOCAL INFILE "orders.tbl" into table orders columns terminated by '|' lines terminated by '\n';
LOAD DATA LOCAL INFILE "part.tbl" into table part columns terminated by '|' lines terminated by '\n';
LOAD DATA LOCAL INFILE "partsupp.tbl" into table partsupp columns terminated by '|' lines terminated by '\n';
LOAD DATA LOCAL INFILE "region.tbl" into table region columns terminated by '|' lines terminated by '\n';
LOAD DATA LOCAL INFILE "supplier.tbl" into table supplier columns terminated by '|' lines terminated by '\n';
Loading tpch Sample Data Into HeatWave
Loading data into HeatWave typically involves identifying the tables you want to load, encoding string columns, defining RAPID as the secondary engine for each table, and executing "SECONDARY_LOAD" load operations. The following statements take care of those steps for you. For more information about preparing and loading tables into HeatWave, refer to the HeatWave User Guide.
To load the tpch tables into HeatWave, run the following statements using the MySQL Client:
USE tpch;
ALTER TABLE nation modify `N_NAME` CHAR(25) NOT NULL COMMENT 'RAPID_COLUMN=ENCODING=SORTED';
ALTER TABLE nation modify `N_COMMENT` VARCHAR(152) COMMENT 'RAPID_COLUMN=ENCODING=SORTED';
ALTER TABLE nation SECONDARY_ENGINE=RAPID;
ALTER TABLE nation SECONDARY_LOAD;
ALTER TABLE region modify `R_NAME` CHAR(25) NOT NULL COMMENT 'RAPID_COLUMN=ENCODING=SORTED';
ALTER TABLE region modify `R_COMMENT` VARCHAR(152) COMMENT 'RAPID_COLUMN=ENCODING=SORTED';
ALTER TABLE region SECONDARY_ENGINE=RAPID;
ALTER TABLE region SECONDARY_LOAD;
ALTER TABLE part modify `P_MFGR` CHAR(25) NOT NULL COMMENT 'RAPID_COLUMN=ENCODING=SORTED';
ALTER TABLE part modify `P_BRAND` CHAR(10) NOT NULL COMMENT 'RAPID_COLUMN=ENCODING=SORTED';
ALTER TABLE part modify `P_CONTAINER` CHAR(10) NOT NULL COMMENT 'RAPID_COLUMN=ENCODING=SORTED';
ALTER TABLE part modify `P_COMMENT` VARCHAR(23) NOT NULL COMMENT 'RAPID_COLUMN=ENCODING=SORTED';
ALTER TABLE part SECONDARY_ENGINE=RAPID;
ALTER TABLE part SECONDARY_LOAD;
ALTER TABLE supplier modify `S_NAME` CHAR(25) NOT NULL COMMENT 'RAPID_COLUMN=ENCODING=SORTED';
ALTER TABLE supplier modify `S_ADDRESS` VARCHAR(40) NOT NULL COMMENT 'RAPID_COLUMN=ENCODING=SORTED';
ALTER TABLE supplier modify `S_PHONE` CHAR(15) NOT NULL COMMENT 'RAPID_COLUMN=ENCODING=SORTED';
ALTER TABLE supplier SECONDARY_ENGINE=RAPID;
ALTER TABLE supplier SECONDARY_LOAD;
ALTER TABLE partsupp modify `PS_COMMENT` VARCHAR(199) NOT NULL COMMENT 'RAPID_COLUMN=ENCODING=SORTED';
ALTER TABLE partsupp SECONDARY_ENGINE=RAPID;
ALTER TABLE partsupp SECONDARY_LOAD;
ALTER TABLE customer modify `C_NAME` VARCHAR(25) NOT NULL COMMENT 'RAPID_COLUMN=ENCODING=SORTED';
ALTER TABLE customer modify `C_ADDRESS` VARCHAR(40) NOT NULL COMMENT 'RAPID_COLUMN=ENCODING=SORTED';
ALTER TABLE customer modify `C_MKTSEGMENT` CHAR(10) NOT NULL COMMENT 'RAPID_COLUMN=ENCODING=SORTED';
ALTER TABLE customer modify `C_COMMENT` VARCHAR(117) NOT NULL COMMENT 'RAPID_COLUMN=ENCODING=SORTED';
ALTER TABLE customer SECONDARY_ENGINE=RAPID;
ALTER TABLE customer SECONDARY_LOAD;
ALTER TABLE orders modify `O_ORDERSTATUS` CHAR(1) NOT NULL COMMENT 'RAPID_COLUMN=ENCODING=SORTED';
ALTER TABLE orders modify `O_ORDERPRIORITY` CHAR(15) NOT NULL COMMENT 'RAPID_COLUMN=ENCODING=SORTED';
ALTER TABLE orders modify `O_CLERK` CHAR(15) NOT NULL COMMENT 'RAPID_COLUMN=ENCODING=SORTED';
ALTER TABLE orders SECONDARY_ENGINE=RAPID;
ALTER TABLE orders SECONDARY_LOAD;
ALTER TABLE lineitem modify `L_RETURNFLAG` CHAR(1) NOT NULL COMMENT 'RAPID_COLUMN=ENCODING=SORTED';
ALTER TABLE lineitem modify `L_LINESTATUS` CHAR(1) NOT NULL COMMENT 'RAPID_COLUMN=ENCODING=SORTED';
ALTER TABLE lineitem modify `L_SHIPINSTRUCT` CHAR(25) NOT NULL COMMENT 'RAPID_COLUMN=ENCODING=SORTED';
ALTER TABLE lineitem modify `L_SHIPMODE` CHAR(10) NOT NULL COMMENT 'RAPID_COLUMN=ENCODING=SORTED';
ALTER TABLE lineitem modify `L_COMMENT` VARCHAR(44) NOT NULL COMMENT 'RAPID_COLUMN=ENCODING=SORTED';
ALTER TABLE lineitem SECONDARY_ENGINE=RAPID;
ALTER TABLE lineitem SECONDARY_LOAD;
To verify that the tables are loaded in HeatWave, query the LOAD_STATUS data from the HeatWave Performance Schema tables. Loaded tables have an AVAIL_RPDGSTABSTATE load status.
mysql> USE performance_schema;
mysql> SELECT NAME, LOAD_STATUS FROM rpd_tables,rpd_table_id
WHERE rpd_tables.ID = rpd_table_id.ID;
+------------------------------+---------------------+
| NAME | LOAD_STATUS |
+------------------------------+---------------------+
| tpch.supplier | AVAIL_RPDGSTABSTATE |
| tpch.partsupp | AVAIL_RPDGSTABSTATE |
| tpch.orders | AVAIL_RPDGSTABSTATE |
| tpch.lineitem | AVAIL_RPDGSTABSTATE |
| tpch.customer | AVAIL_RPDGSTABSTATE |
| tpch.nation | AVAIL_RPDGSTABSTATE |
| tpch.region | AVAIL_RPDGSTABSTATE |
| tpch.part | AVAIL_RPDGSTABSTATE |
+------------------------------+---------------------+
Running Queries
When HeatWave is enabled and the data you want to query is loaded, queries that qualify are automatically offloaded from the MySQL DB System to HeatWave for execution. No special action is required. You simply run the query from the MySQL Client. After HeatWave executes a query, results are sent back to the MySQL DB System and to the client that issued the query.
1. Using the MySQL Client, change to the tpch database:
myql> USE tpch;
2. Before running a query, use EXPLAIN to verify that the query can be offloaded to HeatWave. For example:
mysql> EXPLAIN SELECT SUM(l_extendedprice * l_discount) AS revenue
FROM lineitem WHERE l_shipdate >= date '1994-01-01'\G
*************************** 1. row ***************************
id: 1
select_type: SIMPLE
table: lineitem
partitions: NULL
type: ALL
possible_keys: NULL
key: NULL
key_len: NULL
ref: NULL
rows: 56834662
filtered: 33.33
Extra: Using where; Using secondary engine RAPID
If the query can be offloaded, the Extra column in the EXPLAIN output reports "Using secondary engine RAPID", as shown above.
3. After verifying that the query can be offloaded, run the query and note the execution time. The use_secondary_engine variable is set to FORCED to ensure that the query only runs on HeatWave and does not fall back to the MySQL DB System for execution if it cannot be offloaded to HeatWave for some reason.
Note: The default use_secondary_engine setting is ON, which means that a query defaults to the MySQL DB System and the InnoDB storage engine for execution if it cannot be offloaded to HeatWave due to some issue such as an unsupported operator, etc. With use_seconary_engine=FORCED, the query will fail with an error immediately if it cannot be offloaded to HeatWave.
mysql> SET SESSION use_secondary_engine=FORCED;
mysql> SELECT SUM(l_extendedprice * l_discount) AS revenue
FROM lineitem WHERE l_shipdate >= date '1994-01-01';
+------------------+
| revenue |
+------------------+
| 82752894454.9036 |
+------------------+
1 row in set (0.04 sec)
To compare the HeatWave execution time with MySQL DB System execution time, disable the use_secondary_engine variable to see how long it takes to run the same query on the MySQL DB System.
mysql> SET SESSION use_secondary_engine=OFF;
mysql> SELECT SUM(l_extendedprice * l_discount) AS revenue FROM lineitem WHERE l_shipdate >= date '1994-01-01';
+------------------+
| revenue |
+------------------+
| 82752894454.9036 |
+------------------+
1 row in set (24.20 sec)
Additional Queries
This section provides additional tpch queries that you can use to test HeatWave.
TPCH-Q1: Pricing Summary Report Query
As described in the TPC Benchmark™ H (TPC-H) specification: "The Pricing Summary Report Query provides a summary pricing report for all lineitems shipped as of a given date. The date is within 60 - 120 days of the greatest ship date contained in the database. The query lists totals for extended price, discounted extended price, discounted extended price plus tax, average quantity, average extended price, and average discount. These aggregates are grouped by RETURNFLAG and LINESTATUS, and listed in ascending order of RETURNFLAG and LINESTATUS. A count of the number of lineitems in each group is included."
SELECT
l_returnflag,
l_linestatus,
SUM(l_quantity) AS sum_qty,
SUM(l_extendedprice) AS sum_base_price,
SUM(l_extendedprice * (1 - l_discount)) AS sum_disc_price,
SUM(l_extendedprice * (1 - l_discount) * (1 + l_tax)) AS sum_charge,
AVG(l_quantity) AS avg_qty,
AVG(l_extendedprice) AS avg_price,
AVG(l_discount) AS avg_disc,
COUNT(*) AS count_order
FROM
lineitem
WHERE
l_shipdate <= DATE '1998-12-01' - INTERVAL '90' DAY
GROUP BY l_returnflag , l_linestatus
ORDER BY l_returnflag , l_linestatus;
TPCH-Q3: Shipping Priority Query
As described in the TPC Benchmark™ H (TPC-H) specification: "The Shipping Priority Query retrieves the shipping priority and potential revenue, defined as the sum of l_extendedprice * (1-l_discount), of the orders having the largest revenue among those that had not been shipped as of a given date. Orders are listed in decreasing order of revenue. If more than 10 unshipped orders exist, only the 10 orders with the largest revenue are listed."
SELECT
l_orderkey,
SUM(l_extendedprice * (1 - l_discount)) AS revenue,
o_orderdate,
o_shippriority
FROM
customer,
orders,
lineitem
WHERE
c_mktsegment = 'BUILDING'
AND c_custkey = o_custkey
AND l_orderkey = o_orderkey
AND o_orderdate < DATE '1995-03-15'
AND l_shipdate > DATE '1995-03-15'
GROUP BY l_orderkey , o_orderdate , o_shippriority
ORDER BY revenue DESC , o_orderdate
LIMIT 10;
TPCH-Q9: Product Type Profit Measure Query
As described in the TPC Benchmark™ H (TPC-H) specification: "The Product Type Profit Measure Query finds, for each nation and each year, the profit for all parts ordered in that year that contain a specified substring in their names and that were filled by a supplier in that nation. The profit is defined as the sum of [(l_extendedprice*(1-l_discount)) - (ps_supplycost * l_quantity)] for all lineitems describing parts in the specified line. The query lists the nations in ascending alphabetical order and, for each nation, the year and profit in descending order by year (most recent first). "
SELECT
nation, o_year, SUM(amount) AS sum_profit
FROM
(SELECT
n_name AS nation,
YEAR(o_ORDERdate) AS o_year,
l_extendedprice * (1 - l_discount) - ps_supplycost * l_quantity AS amount
FROM
part
STRAIGHT_JOIN partsupp
STRAIGHT_JOIN lineitem
STRAIGHT_JOIN supplier
STRAIGHT_JOIN orders
STRAIGHT_JOIN nation
WHERE
s_suppkey = l_suppkey
AND ps_suppkey = l_suppkey
AND ps_partkey = l_partkey
AND p_partkey = l_partkey
AND o_ORDERkey = l_ORDERkey
AND s_nationkey = n_nationkey
AND p_name LIKE '%green%') AS profit
GROUP BY nation , o_year
ORDER BY nation , o_year DESC;
Summary
In this post, we stepped through setting up a MySQL DB System with HeatWave, creating tpch sample data, loading the data into the MySQL DB System and HeatWave, and running queries. For more information about HeatWave features and functionality, please refer to the MySQL DB System User Guide, and the HeatWave User Guide. Thanks for reading!
Comments
Post a Comment